


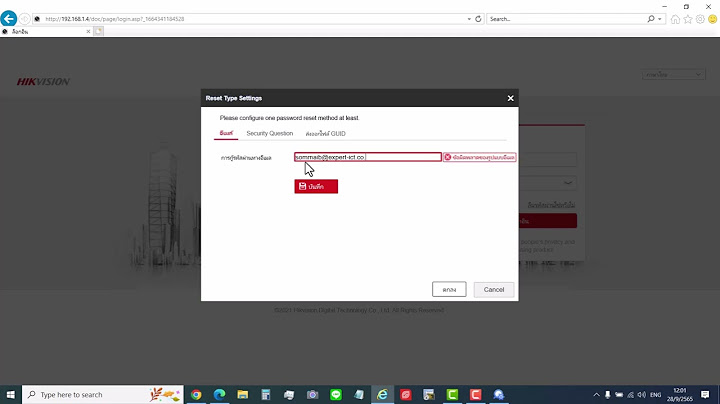
MOZA Mini-MI Primary Calibration TutorialPrimary calibration is needed when the gimbal pan axis drifts to the left or right slowly in static state. Show
Before CalibrationPlace the phone into the holder. Please note that the tilt motor should be on the left side.  Loosen the knob screw, slide the roll arm leftwards or rightwards until it keeps level. Then tighten the screw. Turn on the Bluetooth; Unlock the screen portrait orientation mode; Launch the MOZA Genie App. Click the Bluetooth icon and connect the device. Now, the gimbal is ready for calibration. Start the Primary CalibrationTap the gimbal icon to enter the setting interface,click "Calibrate" to start the calibration. If there is no abnormal situation with the gimbal, please carefully decide whether to calibrate the gimbal. Click “Confirm” to enter the calibration interface. Then the gimbal enters the sleep mode. Place the gimbal and phone according to the on-screen instructions. Please make sure to place the gimbal on a flat surface, such as a flat desktop, otherwise the calibration will be affected. And ensure that the bottom of the phone holder fully fits onto the desk. You can slightly press the top of the phone holder. Click "Start" to begin the calibration. For iOS system, “Gyro calibrating”, “Calibrated!”, “Accelerometer calibrating”, “Calibrated” will appear on the screen in sequence. For the Android, “Calibrating”, “Calibrated” will appear on the screen. Now, the primary calibration has been done. MOZA Mini-MI Advanced Calibration TutorialAdvanced calibration is needed when the gimbal runs abnormally such as crazy drift or rotation. Before CalibrationAttach the gimbal onto the tripod and place it on a flat surface. The surface must be flat, otherwise the calibration will be affected. Place the phone into the holder. Please note that the tilt motor must be on the right side. Move the mobile phone leftwards or rightwards until it keeps level. Turn on the Bluetooth; Unlock the screen portrait orientation mode; Launch the MOZA Genie App. Click the Bluetooth icon and connect the device. Now, the gimbal is ready for calibration. Start the Advanced CalibrationTap the gimbal icon to enter the setting interface,click "Calibrate" to start the calibration. If there is no abnormal situation with the gimbal, please carefully decide whether to calibrate the gimbal. Click “Confirm” to enter the calibration interface. Click the icon on the top right to enter the advanced calibration interface. There are two ways of advanced calibration: Default calibration and Custom calibration. Select “Default Calibration”. Stand the gimbal on a flat surface according to the on-screen instruction. Make sure the pan arm is aligned with the front of the handle. For some smartphones, the tilt arm is not able to be balanced. This won’t affect the actual calibration, just hold the phone with hand to keep the tilt arm level. Click "Start" to begin the calibration. Hold the smartphone, and make sure the phone screen is facing the operator. Turn the phone gently until the lower part becomes green, release the phone when the countdown starts. For iOS phones, “M-angle calibrated”, “Calibration completed” prompts will appear on the screen in sequence. For Android phones, “Calibrate the electrical angle”, “Calibration is successful” will appear on the screen. Please note that the operator must release the phone when the countdown starts, otherwise the calibration will fail. Restart the gimbal and observe if there is anything abnormal. If there is slight drift, please start the primary calibration again. How to do the firmware upgrade and calibration for MOZA Mini-MIHow to upgrade the firmware for Mini-MITurn the Mini-MI off first. Long press the center button and hold on, then long press the ON/OFF button until the status indicator blinks. Open MOZA Genie. Click the device. Firmware upgrade prompt pops out. Click “upgrade”. After the upgrade, restart the device. Step by step tutorial-How to calibrate MOZA Mini-MI with your mobile phoneNotice: Be sure to upgrade the firmware to the latest version before calibration 1 Balance MOZA Mini-MI with your phone until the phone starts to keep the level. 2 Turn on the MOZA Mini-MI 3 Enable Bluetooth on your phone 4 Launch MOZA Genie App 5 Connect the device 6 Tap the gimbal icon 7 Tap the calibration icon 8 Select “confirm” 9 Select default calibration 10 Place the gimbal and phone according to the on-screen instruction and click “start”. 11 Hold the mobile phone to make it level. When the lower part becomes green. Release the phone according to the countdown in the top left corner. 12 The step will last for a while, please be patient and don’t touch the phone. App will automatically enter to the next step of calibration after this step completes. 13 Refer to the on-screen instruction to place the gimbal on a level desk. Click to start the calibration. Wait for while. 14 Now the calibration of MOZA Mini-MI has been done. 15 Restart the device and reconnect it to app. Tutorial Dolly Zoom/ Vertigo Shot with Your Smartphone-MOZA Mini-MIKnow about Dolly ZoomThe dolly zoom is an in-camera effect that appears to undermine normal visual perception. The effect is achieved by zooming a zoom lens to adjust the angle of view (often referred to as field of view, or FOV) while the camera dollies (moves) toward or away from the subject in such a way as to keep the subject the same size in the frame throughout. In its classic form, the camera angle is pulled away from a subject while the lens zooms in, or vice versa. Thus, during the zoom, there is a continuous perspective distortion, the most directly noticeable feature being that the background appears to change size relative to the subject. The visual appearance for the viewer is that either the background suddenly grows in size and detail and overwhelms the foreground, or the foreground becomes immense and dominates its previous setting, depending on which way the dolly zoom is executed. As the human visual system uses both size and perspective cues to judge the relative sizes of objects, seeing a perspective change without a size change is a highly unsettling effect, often with strong emotional impact. The effect was first conceived by Irmin Roberts, a Paramount second-unit cameraman, in Alfred Hitchcock's film Vertigo. So it’s also called “Vertigo shoot”. How To Do It with Your Smart PhoneOf course you need a MOZA Mini-MI, the best ever mobile gimbal. This cinematic skill was not caged in the great photographers’ hands while anyone could achieve it just through the smart attendance of MOZA Mini-MI. Let’s follow EMT and his suggested methods of dolly zoom. 您的浏览器暂不支持播放该视频,请使用浏览器急速模式,或升级至最新版浏览器。 Method 1.1Simply use the scrolling wheel to zoom in while you are moving backwards and forward when zooming out. This is one of the easiest way because you just have to scroll the wheel. Method 1.2Press the button at the bottom of the wheel, it will automatically zoom in or zoom out giving you kind of like automatic mode when moving forwards or backwards. The gear will control the focus by itself and all you need to do is to press the button and move. Method 2Triple click the top to enter the Inception mode. You can do in Inception mode while simultaneously doing Vertigo. So when it’s rotating, you can zoom in and move backward to create some really cool transitions and shots. Isn’t that trilling for you to create such dramatic works? Just come and try your brand new mobile stabilizer MOZA Mini-MI make your time memorable. Tutorial How To Do Advanced Time-lapse with MOZA Mini-MIMOZA Mini-MI Time-lapse Tutorial Videos您的浏览器暂不支持播放该视频,请使用浏览器急速模式,或升级至最新版浏览器。 您的浏览器暂不支持播放该视频,请使用浏览器急速模式,或升级至最新版浏览器。 Supported Phones: iPhone X ; iPhone 8/8 Plus ; iPhone 7/7 Plus ; iPhone 6S/6S Plus/6/6 Plus ; Huawei Mate 10 ; Samsung Galaxy Supported Smartphone Dimensions: 61mm to 92mm MOZA Mini-MI Empowers Your Timelapse Composition as Your Best Mobile GimbalEver desperate for shooting your own cinematic time-lapse clips but blocked back by expensive equipment or complicated operations? Here comes the cure. Easily more than ever can you achieve this just with a $99 MOZA Mini-MI and our sweet guide and tips. Time-lapse is frequently used to capture the sunrise, flowing crowd, flashing vehicles and etc. to generate time-fading feelings. Let’s set out to do it step by step: 6 Steps to Finish Your Masterpiece with MOZA Mini-MIStep 1:The first thing you need to do is to pair your smart phone with your gimbal. Remember to run MOZA genie app to connect them via blue tooth. Step 2:Run MOZA Genie and Select the advanced motion timelapse mode. Don’t forget to read the guide which will help you better understand the shortcut operation. Step 3:Once you get into the advanced timelapse mode, you will be able to choose up to 9 points by tapping the “+” or using the wheel center button. The points help to shape your shooting track so you may choose them tactically. Step 4:Adjust your shutter interval time. Expert EMT suggests to choose shorter interval if you want to make things move really fast. But for sunrise you can use longer interval with longer duration to present a grand moving scene. Step 5:Adjust your total duration time. According to EMT, he often uses 1.0s interval for 10 minutes duration and 2.0 for 20. You could refer to this or explore your unique time-lapse. Step 6:Click “start” or long-press the right wheel button to begin your own advanced timelapse shooting. And MOZA Mini-MI will master all to offer you a brilliant piece. 2 Extra TipsTip 1:Exposure lock will help you avoid waste footage. Auto focus will influence the smooth timelapse so you’d better lock it in advance. Just tap the screen to turn the circle and square red and make your focus lock. Tip 2:Editing software makes your clip even cooler. You can edit some part of the clip to be quite slow for emphasizing your feature or you can make some part faster to accomplish smooth transition. Thanks to EMT contributing to such gorgeous guide and tips. And we have spared no efforts to be devoted to friendly innovative film making, even if with your daily-use smart phone. Just follow our guidance and make your own fantastic composition with MOZA Mini-MI! |

Moza mini mi จ บม อถ อแนวต งด ม ย
กระทู้ที่เกี่ยวข้อง


ลิขสิทธิ์ © 2024 th.ketajaman Inc.